CHARACTER TOOL 4.1.0 MANUAL
- Plugin updated to 6.0.0
- Depreciated: “Set ML to OML for all skills…” under Skills menu.
- Depreciated Secondary window with character list.
- Depreciated import and export of files due to legacy file format issues.
- Corrected: Drop-down menu under settings:skills shows “Craft/Lore” instead of “Lore/Craft” (thanks to Philipp Kullman).
- Added check for social class and culture before rolling random occupation (thanks to Philipp Kullman).
- Improved graphic look and feel and laid the ground for future graphic changes.
- Improved quality of deity regalia images and separated description and image.
- Improved quality of menu icons and modified how active and inactive menu icons are indicated.
- Fixed issue with window resizing for list of Minor NPCs where it didn’t respond to resize.
- Updated edit and creation method all over the board while making the layout more consistent.
- Updated icons for edit, deletion and viewing list data and in the top of the main window.
- Rewrote the script for re-rolling Psyche and Medical.
- Changed the way editable (white) fields are edited and added indicator that the field is selected.
- Corrected references to “Ritual” to be “Invocation”.
- Unified how Character spells and Invocations are presented into one list.
- Added check of valid armour locations when adding armour pieces to character.
- Merged Background menu alternative into Character menu alternative.
- Rewrote code for Groups from scratch, depreciated Clone function.
- Fixed issue with new guilds not showing the badge image (Thanks to Noel).
- Fixed issue with approved coverage locations missing out on locations Ca, Ch, Chf and Chb.
- And much more…
- Revise armour and weapon input and data storage method to be same as for characters.
- Revise Funds, Gems & Jewelry input and storage method to be same as for equipment etc.
- Improve Group management.
- Re-introduce export and import of files.
- Syntax check for occupation skills when creating or editing an occupation.
- Suppport for Minor NPC’s will be depreciated in coming updates – do not rely on this functionality.
CHARACTER

A list of characters are shown, as filtered by the selected group. Each row shows an individual characters name, species, occupation, attributes and basic combat information. If a character is locked (see Character details below), then this is reflected with the tag [Locked] and the Character Information column shown in red.
In addition, there are five more indicators to the left of the Character Information column – one or more dots shows if the character is has steeds [H], is a Shek Pvar [S] and/or is a Priest [P]. An “!” signifies that the character has a followup, and a cross that the character is dead.
Clicking on a line will show the Character details for the selected character. Clicking on the deletion button in the leftmost column will delete a character.
This tab provides a quick overview of a selected character. The attributes, skills, weapons and armour are summarized.
This tab provides a detailed view of the characters Birth/Family, Medical, Psyche, Appearance etc. All the information is editable. Some of the entries may be randomized by selecting the Dice icon after the entry field. Changing an attribute will immediately impact the skills depending on that attribute.
The section Character properties shows character properties, including an unique character identifier in the upper right corner of this section.
This section contains a summary of background information – for a randomly generated character it also contains a section of random Friends and Enemies according to the rules.
A template image, depending on sex and species, is shown as a portrait – to change the image used, right click and select “Insert picture…”.
The fields “Full size portrait” and “Achievement” may be changed in the same way. The proportions should be 80×100. The guild badge is selected in the drop down menu below the badge field.
This tab allows free-form GM notes for the character.
This tab allows the user to enter information that supports the FFF format.
For each character it is possible to add a Followup – this list shows ALL followups. To add an entry, select the button “+ GM FOLLOWUP” and enter information and for which character the entry is intended for.
COMBAT

This section shows Combat factors, penalties and injuries for a character. Penalties are calculated depending on amount of carried equipment and armour. There is a part for Special penalties – the penalties listed here does not impact ML’s etc. automatically.
The load summary shows how much the character is carrying depending on what set is selected. A set is a specific selection of armour, equipment, weapons, written works and esoteric objects – there may be up to three different sets for each category. A set could, for example, be the type of gear worn when in a city and another set the type of gear used in the wilderness. Also, there are a number of lines available for things that don’t fit into the five categories. Total weight is recalculated automatically as well as Encumbrance penalty.
This section lists all weapons the character masters. A weapon may be part of a set, as discussed in the Combat Factors & Penalties section. To add a weapon, select the last row in the list and start typing the name of the weapon you require. If the weapon is listed in the Weapon settings, then the weapon stats will be entered automatically. Character Tool will attempt to enter the ML of an appropriate skill in the ML column for each weapon – see Settings/Armour and Weapons to specify which skill is connected to which weapon.
If no ML is listed this could be due to no appropriate skill being entered in the skills section – it is possible to set the ML manually by clicking on the ML entry.
Entering a value which is zero or leaving the field empty will substitute the ML with the corresponding skill ML (if any), and is indicated with a green box for ML. A value larger than zero will override the corresponding skill ML – this is indicated with a yellow box for ML.
AML and DML will be calculated automatically for the weapon. The A/D column is required to be on the format “AML/DML” (e.g. 10/5).
At the bottom, the weight of each set is shown as well as the currently active set (as seen in the Load summary) indicated with a green colour.
To add a weapon to the character, select the button “+ CHARACTER WEAPON”.
This section lists all carried armour pieces. To add a armour piece, select the last row in the list and type in the Material first. After this, select the Name field and select from a list of available pieces depending on the Material selection.
When a valid Material and Name combination has been selected, the Coverage field will be entered automatically based on data in the Armour settings as well as the weight of the piece. The weight is shown with the Size factor taken into account. It is also possible to enter an Esoteric Level as well as a Armor Quality for each piece.
It is possible to override the fields, entering other values than those available in Settings. In order for the Area protection calculation to work, the coverage must use the armour piece names defined in the rules, and be separated by a space character.
At the bottom, the weight of each set is shown as well as the currently active set (as seen in the Load summary), indicated with a green colour.
There are a number of predefined armour profiles (defined in Settings) – by selecting the button “ARMOUR PROFILE” in the bottom of the window, it is possible to replace the current listed armour pieces with a predefined list.
This section lists the cumulative protective values (Blunt, Edged, Pointed and Fire) for the currently active set. To update this section, select the Update compound armour button. Although it is possible to edit each area manually, it is recommended that this is done automatically.
The protective values for each material type is specified in the Armour & Combat settings.
GROUPS
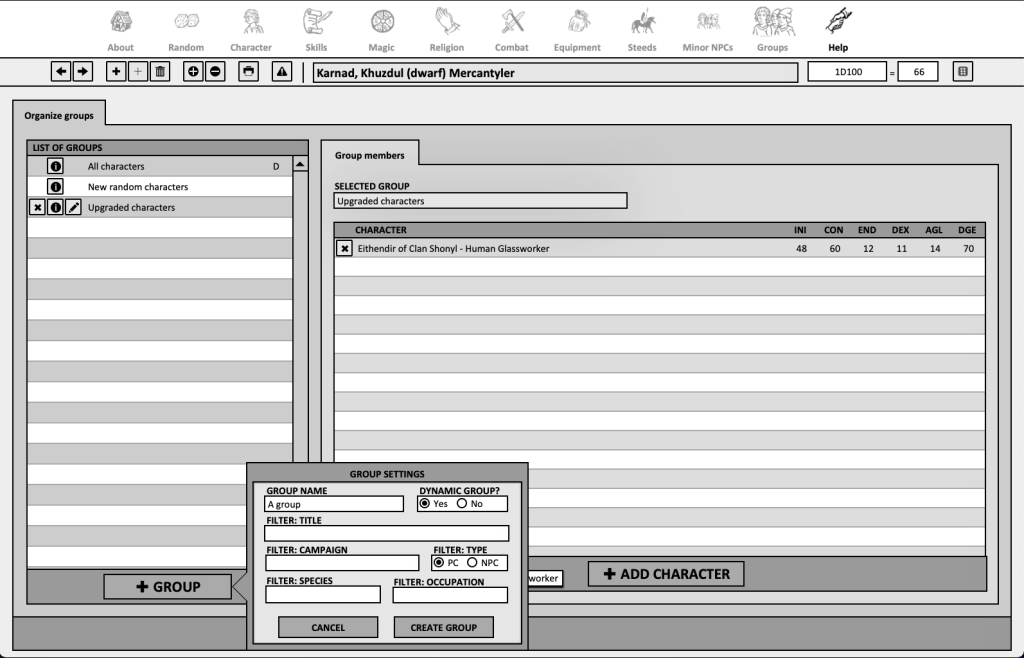
A normal group, or static group, contains one or more characters which are assigned to the group one by one. A character may be part of more than one group, but only one character may be added to a group at one time.
To create a new group, select the button “+ GROUP” – set “Dynamic group” to No. The name must be unique.
To add a character to a group, select a group using the “i”-icon in the list of groups – this will show the current list of characters for the group. Select a character in the drop down menu at the bottom and then select the button “+ ADD CHARACTER”.
Deleting a Normal group in the list of groups will not delete a character from the application.
A dynamic group is similar to the normal group with some differences – firstly, the members of the group are assigned dynamically depending on five parameters: Campaign name, Title, Species, Occupation and PC/NPC.
Thus it is possible to create a Dynamic group called “Player Characters” which lists all characters with the type “PC”. Or a Dynamic group called “Shek Pvar PCs” which lists all player character Shek Pvars. A Dynamic group is signified in the List of groups with a “D” in the list of groups. If a new Shek Pvar PC Major character is created, it will show up right away in the list.
To create a new Dynamic group, select the button “+ GROUP” and set choose “Yes” for Dynamic group? This will allow for specifiying settings for the dynamic group. The name must be unique.
Deleting a Dynamic group in the list of groups will not delete a character from the application.
EQUIPMENT

This section shows ordinary equipment. Weapons and armour should be listed unde Combat instead.
An equipment piece may be part of a set, as discussed in the Combat Factors & Penalties section.
To add an equipment piece, select the button “+CHARACTER EQUIPMENT” last row in the list and either select an item in the drop-down menu or enter text in the Equipment-box, which will allow for specifying more details. If it is listed in the Equipment settings, then the weight will be entered automatically. It is possible to enter or edit equipment that isn’t listed in the Equipment settings.
At the bottom, the weight of each set is shown as well as the currently active set (as seen in the Load summary), with green indicating the selected set.
This section lists carried and available funds and jewelry. The origin of a currency is listed in the left-hand column and amount depending on type (gold, silver or farthing) in the appropriate column. The source of an Usurers note usually is listed in the Notes column. Gems and jewelry are listed in the rightmost field.
This section lists available written works. A written work may be part of a set, as discussed in the Combat Factors & Penalties section.
To add a written work, select button “+ WRITTEN WORK” and enter the name of the written work. For each work, the Author, Weight, Language, Script and amount of time read may be entered.
At the bottom, the weight of each set is shown as well as the currently active set (as seen in the Load summary), with green indicating the selected set.
This section lists available items of power etc. referred to as Esoterica. An Esoteric item may be part of a set, as discussed in the Combat Factors & Penalties section.
To add an Esoteric item, select the button “+ ESOTERICA” end enter the name of the item. For each item, the Weight and Location may be entered.
At the bottom, the weight of each set is shown as well as the currently active set (as seen in the Load summary), with green indicating the selected set.
MAGIC

This section shows background information for a Shek Pvar character such as Primary convocation, rank, teachers and peers etc. It also lists the convocational skill base and ML as well as a list of spell books.
To show description and symbol of Convocation, first select a Primary Convocation in the drop-down meny. This will also show Convocation skills, and allow for setting the Master Level.
These tabs shows all of the spells a character has learned, sorted on convocation name and then the spell name..
To add a spell to the list of spells known by the current character, select the button “+ CHARACTER SPELL” and select a spell in the drop-down list. This will allow for specification of spell information such as ML etc.
To the right it is possible to view spell details for any spell by selecting the drop down menu “Show spell information for”.
MINOR NPC'S

There are two ways to add a minor character – either by random generation or by creating an empty character by selecting the button “+EMPTY MINOR CHARACTER”.
Once selected, the basic characteristics & attributes may be edited by the user.
This will allow for editing of the selected Minor character. Any change swill be saved immediately.
PRINTING

Four different types of printing is available – Character sheets, Book of Spells, Book of rituals and Groups.
Most of the types may be printed in German or English, depending on the Printer material language selection.
All of the printouts may print on A4 or US letter. To get more control of the printing, press the CTRL-button when selecting print.
Selecting this type allows the user to print Chronicles, GM notes, Character sheets, Steeds and Friend, Foes & Followers sheet for the currently selected character. The currently selected character is shown in the top section of the window.
The Major Characters overview allows the user to print one or more selected characters to an Overview page, which has room for two characters per page.
In this section, the currently selected characters spells (if any) may be printed by selecting “Character spells”. To print out all spells of a selected convocation, select one of the other selections (e.g. Savorya spells).
In this section, the currently selected characters rituals (if any) may be printed by selecting “Character rituals”. To print out all rituals of a selected deity, select one of the other selections (e.g. Peoni rituals).
This section allows the user to print out a number of characters, as defined in the groups section. There are two different types of printing – Combat cards and Combat order overview. The combat cards may be printed in colour or Black and white.
RANDOM GENERATION OF CHARACTERS
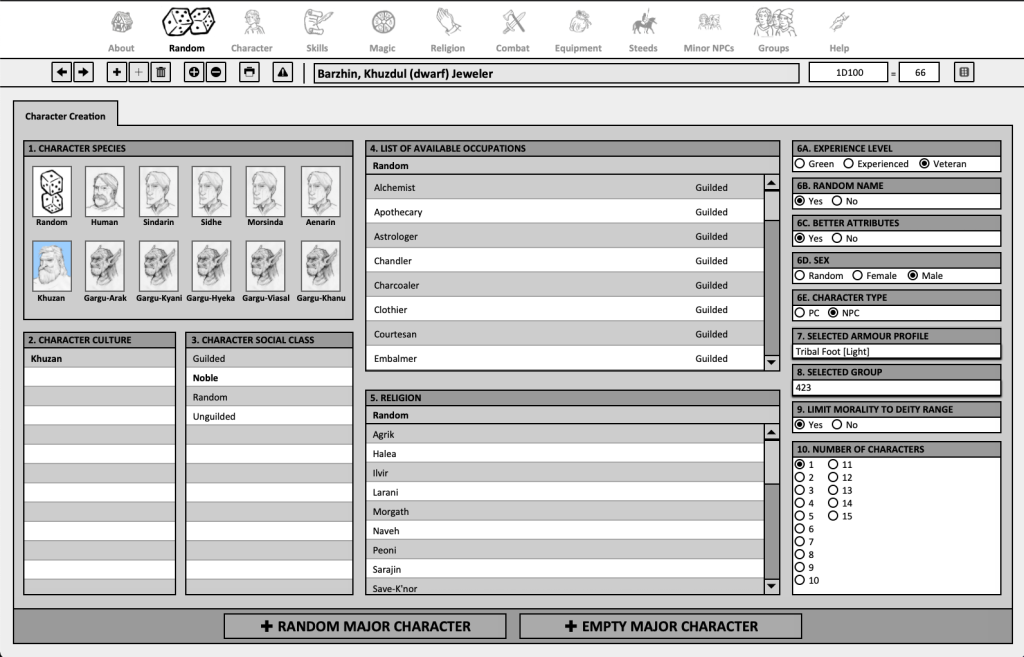
There are two types of characters that may be created in Character Tool 3 – a Major character or a Minor character.
A Major character contains all the data needed to describe a character, while a Minor character is a simpler version with much less detail.
Although an empty character may be created by selecting the button “+EEPTY MAJOR CHARACTER”, it is recommended that the user rolls a random character and then modifies it.
To roll for a character, the user needs to select a number of parameters in order, starting with the species of the character.
If random creation is selected, then the species will be rolled according to HM3. Please note that Gargun characters may not be created when random is selected.
The available alternatives depends on the selection of Species. If random is selected, the culture is selected given Birthplace according to HM3 rules.
The available alternatives depends on the selection of Character Culture. If random is selected, the social class is rolled for according to HM3 rules.
Please note that if a Gargun culture is selected, then the social class is set to Gargun. This is an extension of the HM3 rules in order to allow for Gargun Characters.
The available alternatives depends on the selection of Character Culture. If random is selected, then the the occupation is rolled for according to HM3 rules.
Please note that if Gargun culture is selected, then the different sub-species are listed as occupations – this is an extension of the HM3 rules to adapt the rules set forth in the Gargun article where each subspecies has their own starting skills and abilities.
The available religions, including Barbarian religion, are listed here. If random is selected, then the religion will be rolled for with equal probability.
Certain occupation choices may limit the selection of religion, notably a priest of specific religion but also Barbarian characters.
A more experienced character may be created by selecting the experience level. The rules for experience are partly based on the Veteran Characters section in Character 19 of the rules, but modified slightly.
As stated in the rules, a Veteran Character gets a number of Option points depending on activity level. In Character Tool 3, this is translated as being 12 skill development rolls for each Option point. Further, it is assumed that the activity level is Normal when adding experience.
A Veteran character is assumed to have eight years of experience, and an Experienced character five years. This yields the following number of skill development rolls given the experience level:
Green: 0 Experienced: 60 Veteran: 96
75% of the skill development rolls are spent on occupation skills (if possible) and the remaining on non-occupational skills.
If random is selected, a random name is picked given culture and sex.
If set to yes, Key attributes as defined by Character 7 of the rules will be rolled with 4d6, where the lowest is deleted.
If set to random, the Sex will be rolled as defined by Character 2 of the rules.
All rolled characters will be added to the group specified here, as well as the group “New random characters”.
Even if no group is selected, characters will be added to “New random characters”. Any previous characters in this group will be deleted from the group.
RELIGION

This section shows religious background information for a all characters, but also more specific information for Priest or Shaman characters such as fighting/clerical order, chapter house etc.
Here is also shown the characters religions view on other religions.
This tab shows all of the invocations the character knows. To add an invocation to the list of invocations known by the current character, select the button “+CHARACTER INVOCATION”. Invocations are listed by deity, and then invocation name.
To the right it is possible to view invocation details for any invocationby selecting the drop down menu “Show invocation information for”.
SETTINGS

This section contains settings for Current year, update checking and URLs used in Character Tool. Do not edit “SETTINGS FOR LINKS AND URLS”.
It is possible to create a formula for Endurance calculation, which allows for user discretion. Also, the Automatic and optional skills for Priests, Shek Pvar, Tribal characters and Shamans are configurable. If these are edited, it is important to use the same syntax as in the default configuration, e.g. “SKILL ONE/4, SKILL TWO/3 etc, where 4 and 3 are the OML for different skills.
The Armour profiles tab allows creating and editing armour set profiles. See Combat for more information.
To edit an existing set, select the set in the left-hand list, and edit the set in the tab for Profile contents. Use the button “+ ARMOUR PIECE” to add pieces to the selected profile.
To add a new profile, use the button “+ ARMOUR PROFILE” and specify name and type (light, medium and heavy).
This section consists of two tabs – Armour pieces & materials and Weapons.
In the Armour pieces tab, all available armour pieces are defined. To add an armour piece, select the button “+ ARMOUR PIECE”.
The protective values may be changed, and materials added – please note that current character armour will not be updated without updating the Armour compound data.
Finally, the Weapons tab allows for editing weapons. Each weapon has, in addition to the weapon data, an assigned base weapon skill – this is used to automatically enter the ML (if any) of a weapon.
Use the button “+ WEAPON” to add a new weapon.
This section shows all available equipment, which is made available in the Equipment section.
Use the button “+ ITEM” to add a new piece of equipment.
This section has two types of settings. To the left are all available guilds and their corresponding icons. If an existing guild is edited or deleted, it will impact the current characters guild settings and could cause the characters not to show guild icons properly. Use the button “+ GUILD” to add a guild.
To the right is a list of names, used when rolling for random names based on Sex and culture. Use the button “+ NAME” to add a new name.
In this important section, all occupations are defined. It is highly recommended that all parameters are entered – editing an existing occupation will not impact existing characters.
The Occupation skills are entered using the following syntax: Skill one/x, Skill two/y etc. They need to be separated by comma and a space after the comma. Each skill name must have an exactly corresponding skill name defined in the Skills section. Valid expressions for X are SB2, 2SB, SB, 70+SB2, 70+SB, 70+2SB, SB+70, 2SB-70, 70-SB2 etc. A single numerical value is treated as “2SB”.
To add an Occupation, select the button “+ OCCUPATION”.
This section is one of the critical sections of Character Tool which almost all random generation of characters depend on.
Generarely it is a bad idea to edit the tables and the information in them.
The religion section defines Deity descriptions and Invocations. The Deity Names needs to correspond to the names of deities used in rituals. as well as Priest (and Shaman) occupation names.
For a Priest Character to be created properly, the name of the occupation needs to be “Priest of deity” (e.g. Priest of Ilvir) and there needs to be a ritual skill named “Ritual – deity” (e.g. Ritual – Ilvir). To add a Deity, use the button “+ DEITY”.
Under the List of all Invocation tab, all rituals are listed – to delete, view or edit any one of the rituals, use the corresponding buttons. The View invocations tab shows a ritual, and under Edit invocations the ritual may be edited.
Deleting or changing a ritual will impact characters who uses that skill.
To add an invocation, use the button “+ INVOCATION”.
The Convocation descriptions tab allows the user to edit the descriptions and other parameters for a convocation. It is not possible to add, rename or delete convocations.
In the Spells tab, all spells are listed – to delete, view or edit any one of the spells, use the corresponding buttons. Deleting or changing a spell will impact characters who lists that spell.
To add a spell, use the button “+ SPELL”.
The skill list shows all available skills – to delete, view or edit a skill, select the corresponding buttons. In the View skill tab to the right, a selected skill is shown.
When entering sunsign modifiers, they need to be entered using the sunsign syntax “SUNSIGN ONE/+3, SUNSIGN TWO/-1” etc. All sunsign modifiers need to be separated by a comma and a space. See occupations for how the OML field is used.
Changing any one of the parameters will impact everything except ML in characters who have the skill.
To add a skill, select the button “+ SKILL”.
This section describes the available steeds for Character Tool. Here, in a simliar manner as for rituals, spells and skills, the steeds may be edited, or new steeds may be added.
To add a steed, use the button “+ STEED”.
SKILLS

At the bottom of the window, there are two buttons: “+ AUTOMATIC SKILLS” will add automatic skills as defined by the rules, and “+ OCCUPATIONAL SKILL” will add occupational skills as defined by the rules.
Add a skill to the character by selecting the button “+ CHARACTER SKILL”. The contents of the OML formula field is restricted to a formula on the form “SBx+y” or “SBx-y”, where x is an integer and y is an integer. E.g. SB4+10, 10, SB2 etc.
To the right it is possible to view skill details for any skill by selecting the drop down menu “Show skill information for”.
STEEDS

To add a new steed, select the button “+STEED” and specify name and breed. With a selected steed, it is possible to edit Birth and attributes and Apeearance & history
Steed templates may be edited in Settings.
To the left is a list of available steeds – a steed is selected by clicking on the correct row in the list, and then the steed may be edited. Combat factors such as Initiative and move may be entered – if the Rider ML is entered, then the Riding EML is calculated.
The load summary lists total load given the selected equipment and weapon set for the steed. A number of weapons, such as bite, tear etc. may be listed in the weapons section.
This section shows the current set of armour carried and the cumulative values. This is done manually,.
This section lists all items carried by the steed. An equipment piece may be part of a set, as discussed in the Combat Factors & Penalties section.
To add an item, select the last row in the list and start typing the name of the item. For each item, the Weight and Location may be entered.
At the bottom, the weight of each set is shown as well as the currently active set (as seen in the Load summary), with green indicating the selected set.